Alien Skin Software Bokeh 2
April 1, 2011
It didn’t take many years after the introduction of “bokeh” into the vocabulary of photographers for software companies to create programs producing out-of-focus effects in a Photoshop-compatible plug-in. Bokeh 2 builds on the success of the original Alien Skin Bokeh 1 software with many added capabilities, and a significant increase in preview and processing speed.
As with the original Bokeh, Bokeh 2 includes presets to simulate the effect of a few select lenses at a couple of aperture settings each. You can still choose radial or half-planar shapes to control the area of sharpness, and there is still a vignette tool to further draw the viewer’s eyes to the area you decide is most important. But Bokeh 2 expands all of these capabilities and adds many more.
New in Bokeh 2 is additional motion blur settings. One gives a spiral “zoom” effect. Also new is a spin effect, as if the camera had been rotated during the exposure, but a portion of the image was frozen with your flash. The radial tool from Bokeh 1 is still here too.
You can now combine multiple radial and planar regions for more control over the focus area. There is a new full-planar tool that softens in opposite directions from a central area of sharpness. Since the blurring process eliminates any grain or noise in the image, Bokeh 2 now has Grain Matching sliders to add grain to the blurred areas.
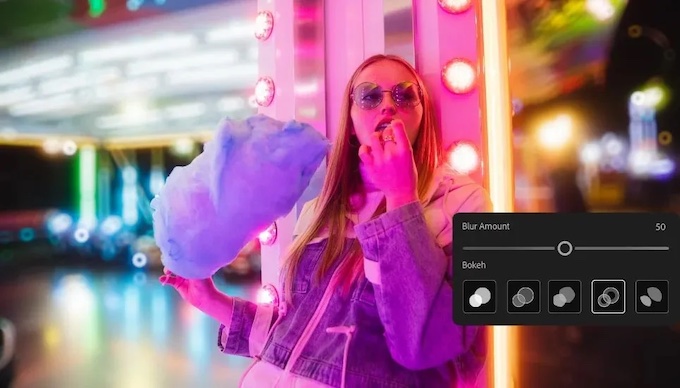
With Bokeh 2 you can add creative apertures such as hearts, stars, diamonds, cross-stars and other effects to the highlights of the image. Vignettes now can be high or low key, and can be independent of the focus region. Bokeh 2 runs as an external editor for single or a batch of images in Lightroom 2 or later, and does not require Photoshop to be installed to run. And finally, although I may have missed something, Bokeh runs in 64-bit Photoshop on both the Windows and Mac platforms.
The Bokeh 2 interface has undergone some changes to incorporate the new features, but is still basically the same. The opening screen features three tabs, one to select the Settings to apply, one to adjust Bokeh and the last to add and control a vignette.
The Settings tab lets you create and manage the program options. It is divided into two sections, one for factory settings and one for settings that you save of your own. The factory settings are organized into seven categories: Creative Aperture, Motion, Traditional Lenses, Grain, Highlights, Vignette-Natural, and Vignette-Region based. Each category has multiple sub-categories. None of the factory settings alter the focus or vignette region controls. This allows you to adjust the region controls for your image and then apply different effects without changing the regions.
The Bokeh tab contains the controls you use to add and adjust the blur in the image. Here you choose what type of region to use for the blur (radial, full-planar or half-planar) and you adjust its position, rate of falloff and strength. A Show Mask button allows you to see exactly where the effect is being applied, but it would be nice if the mask would display at less than 100 percent opacity so that you could see the image through it. Other sliders give you control over highlight brightness and grain matching.
The Vignette tab has options for matching the vignette to the blur region, creating a custom region or applying a traditional edge vignette. The main vignette control is centered at a setting of “0.” Sliding it to the left creates a gradually darker vignette and sliding it to the right creates a gradually lighter vignette. The vignettes act on tones in the image, rather than simply overlaying gray or white. This is the best way, but it tends to build up saturation when the vignette is very dark, so there is a Bleach slider to desaturate the colors if needed.
Despite all of the added capabilities and enhancements in Bokeh 2, I find it most useful when I select, or mask a foreground subject first, and then use the program to throw the background out of focus. The resulting blur just looks more “photographic” than any of the blur options or unsharp mask in Photoshop. I don’t know if anyone has bothered to actually test whether the preset lens blurs actually mimic the lenses they are named after, or whether that even matters. They do a beautiful job of softening the background.
But for me, Bokeh still lacks some features that I need and that other focus software incorporates. There is still no capability to brush on or erase focus (add to or hold back the focus mask). Nor can you export the focus mask as an alpha channel so that you can adjust it later in Photoshop. If you are investing the time to use focus software for any purpose other than throwing the background completely out of focus, the ability to control the focus mask is essential.
MSRP of Alien Skin Bokeh 2 is $199. Registered users of Bokeh 1 can upgrade for $99. A free 30-day trial version of Bokeh 2 is available at www.alienskin.com. There are also a number of excellent tutorials to get you quickly up to speed with the program.
Stan Sholik is a commercial/advertising photographer in Santa Ana, CA, specializing in still life and macro photography. His latest book, Professional Filter Techniques for Digital Photographers, covering both on-camera analog and post-production digital filters is published by Amherst Media.


